November Prep
Winter is coming in- and its been doing some serious raining here- rain as big as green peas and coming down like a thick, well, a thick shower of green peas- and the river is flooding and traffic is backed up for miles and miles, long lines of headlights across the river, reflecting in the black water. At least its not a fire.
I have a new system for the winter- each year I modify what I did the year before. It takes a lot of sitting at the corner bar and drawing and figuring out how to get it to be simple, and something I can do a lot of- there are 35 or 36. hives I know already. if there were 100, I wouldn't do any of this. If there were 40 I'd be slow at it. This is the benefit, I guess, of having another job, and this really being a hobby.
To start with- I am trying to eliminate putting a big roof that blows off, on a roof that doesn't. Too much work. Wasn't with 5 or 10 hives, is now- and having some hives on the roof- if you ever heard a 50 mph wind pick up a roof with a concrete block on it and throw it across the yard- 20 or 30 feet- its dramatic. Not a great safety feature.
So I designed a new sort of entry for winter- out of standard 1.5"x1.5" drip flashing, and I cut it in 20" lengths. As below. The state senator (voted in by two counties) to the left- and she comes in later.

I have a wood jig that I mark with a sharpie for the metal- but first I put the flashing in another jig, and bend the drip so its up, not down. Then I cut it- and bend it . I bend and hammer it so it has no sharp edges.

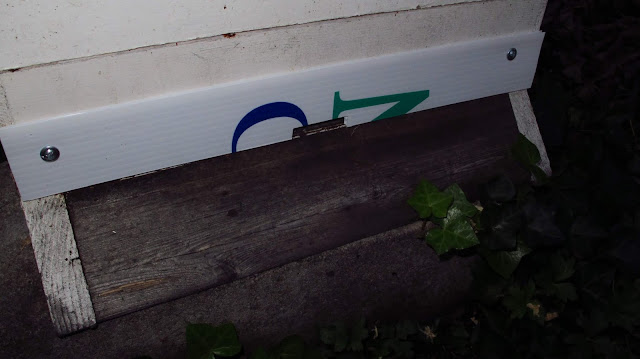

And then I wrap the material, using white tacks (one in this pic), ans pulling it tight around each hive. It doesn't matter how tall the hives are, as I lap the long piece over the short piece below. More photos on this later.

Here's the winter lowdown:
I have a new system for the winter- each year I modify what I did the year before. It takes a lot of sitting at the corner bar and drawing and figuring out how to get it to be simple, and something I can do a lot of- there are 35 or 36. hives I know already. if there were 100, I wouldn't do any of this. If there were 40 I'd be slow at it. This is the benefit, I guess, of having another job, and this really being a hobby.
To start with- I am trying to eliminate putting a big roof that blows off, on a roof that doesn't. Too much work. Wasn't with 5 or 10 hives, is now- and having some hives on the roof- if you ever heard a 50 mph wind pick up a roof with a concrete block on it and throw it across the yard- 20 or 30 feet- its dramatic. Not a great safety feature.
So I designed a new sort of entry for winter- out of standard 1.5"x1.5" drip flashing, and I cut it in 20" lengths. As below. The state senator (voted in by two counties) to the left- and she comes in later.


I then take the political sign that are in our my and cut it in 1.5" strips, with a 3/8" x 1.5" entry. This stuff is great- a tight fit- and I screw it into each hive with a 1/2" lathe screw- a perfect screw to use on hives- flat, with a wide head. I am thinking this is way better than what I used to do in wood.

Then the magic ingredient- I used this on 10 or more (ok- I cant recall) hives last year- and convinced myself that on multiple planes, this was a worthwhile thing to do. Is it really? Probably not. But it might be!
I take a 36" role of 15 dollar weed mat, and cut 12" off with a handsaw (not a cutoff saw- it melts and sticks together).

Then I roll these rolls out to 75" in length, and cut them. I mark a 16.25" wide cut line, on the 12" roll, 22" in, and move on to the next one. A 50 foot roll makes 8.
The 12" piece goes at the bottom of the hive, and laps the entire base, right to the bottom. It has to notch over the entry.
I screw in the drip like so:

And then I wrap the material, using white tacks (one in this pic), ans pulling it tight around each hive. It doesn't matter how tall the hives are, as I lap the long piece over the short piece below. More photos on this later.

Here's the winter lowdown:
- On top of every hive, is a 4" to 6" wood box. with hardware cloth at the bottom, and a 3/8" spacer below that. I fill the box with cedar shavings, right up to the brim.
- In the past, I had a 1 1/2" box below this, with a tray, and hinged to the upper box. In the tray I put dry sugar. It was insurance, and worked. But if I left it on too long- even a week or two- a good hive would go crazy and rapidly build comb in winding networks- and as soon as they were drawn- the queen would lay in them. Because they were warmest- top of the hive- I am sure. So I am not doing those now.
- On top of the vent box, at the front, I screw in two sheetrock screws, so they stick up an inch or less. This is to hold up the telescoping lid, and allow the chips to breath, and the top drains to the back, drips there, not the front.
- I nixed the big roofs. They might come back- but sheesh- a lot of work- blowing off, tossing CMU blocks across the yard, having to pull them all off, then put them on, I like them- but too many hives made this impractical. Even when not on the hive- just sitting there in a stack- they blow off, or hide rats.
- Below the vent box, every hive is the same, pretty much- three Western supers. In these, right now, are two Apivar strips, at the end of their service, which I need to pull out (see earlier entry as to how I am doing this without pulling the hives apart). Some hives, I notice, still have OA towels in them from Summer. Last year I had them in all winter. Tempting.
- These sit on slatted bottom board boxes- at least, about 25 do. I don't know that I know that these are a good thing. But I notice a few things- they make it impossible for bees to enter the hive at the center, and climb up. They change. they land at the right or left of the opening, and climb up the sidewalls inside. No bee goes to the center, if the opening is wide open. So- when one sticks on an entrance reducer- with a center hole- one wonders how they work it out. Still- I feel pretty sure that the bees, and queen, use the lowest super more seriously. But it seems to me that there could be some improvements.
- That sits on various types of bottom boards. New hives have solid ones, others have screened. The real plus of screened ones, is that they don't have to be sloped. The real minus- is that they are more work, and I have to keep cleaning off the mite boards of crap- and its not how the old Beekeepers of yore used to do it. Another plus- you get to see where the activity is- and how active it is- and when you do a mite treatment- you get to see the mite death. Which is satisfying.
- Finally- all the above for this final last thing- which I think is the core of this year's whole method. And I start a new section for this.
Up north, in a forum I was once a part of, they all seem to buy these vinyl blankets that they wrap their hives with. Despite that being completely and utterly discounted over 100 years of beekeeping history- new beekeepers get sucked in. I did- a little-despite never having had to worry about it before- I thought I'd wrap hives. Dumb. A moisture trap, a way that bees can't sense the temperature, or react to winter sunshine- yet lots of folks seemed to think it was a plus. I think they were thinking that bees were like us- needing a sweater.
For myself, I tried wrapping. And in the end- settled on a breathable, durable, non-toxic, weed fabric, in 36" rolls. Costs 15 bucks for 50 feet, and I can get 8 hives, exactly, from each roll. I have a way I cut it, so it fits perfectly. I attach it with the lowest tech of all- thumbtacks- $1.49 for 80-and way better than stapling it- as I used to do.
In addition, I make a reducing entry, and a custom drip flashing, that drains rain to the side. It works great, and the fabric sits on top of it, so no bees go up under the fabric. Here, I think, are the virtues of this fabric:
- It breathes. It is, in fact, not weatherproof, but is more like what we call, in architecture, a rain screen. Or a drain mat (on a foundation wall) It buffers the rain- which sheds down, and it dries quickly- but it lets the equipment dry out, it doesn't condense inside.
- It is a wind barrier- which in all accounts, is a thing worth guarding against. Wind can't blow through the cracks- and if a hive is opened up. the propolis seal breaks , and its too cold for bees to fix, so the barrier protects this,
- It protects the equipment. In the PNW, if the hives are out all winter, the mold- and the paint, if you paint them (you should, I think), peels up. And everything on the bottom gets moldy. This might be the main reason I do this- the longevity of the equipment.
And it looks pretty good.


Comments
Post a Comment